
I have always liked the idea of espalier. A fruit tree flat against a wall, branches running in neat horizontal lines, producing fruit in a space where a normal tree would never fit. It looks impressive. But the real appeal, for me at least, is practical. Espalier lets you grow fruit in small gardens, along fences, or against house walls where a freestanding tree is not an option.
The technique is old. Monks in medieval Europe trained fruit trees against monastery walls to capture warmth and extend the growing season. The principles have not changed much since then. You are working with the tree’s natural growth habits, redirecting energy from vertical growth into horizontal branches that fruit more readily.
What has changed is that most of us are working with considerably smaller spaces than a monastery orchard. Which is exactly why espalier keeps coming back.
Choosing the right tree
Not every fruit tree takes well to espalier training. The best candidates are apples and pears, particularly on dwarfing or semi-dwarfing rootstocks. These fruit on spurs, short stubby growths that develop on older wood and produce fruit year after year. That spur-bearing habit suits the fixed framework of an espalier well.
For apples, look for varieties on M26 or M9 rootstock. M26 gives you a manageable tree that still has enough vigour to fill a framework. M9 is more dwarfing and suits smaller spaces, but needs good soil and permanent staking.
Pears on Quince A or Quince C rootstock work well too. Conference and Doyenné du Comice are classic choices. Pears actually suit wall training particularly well because they benefit from the extra warmth a south-facing wall provides.
Stone fruits are a different story. Cherries, plums, and peaches do not form spurs the same way, so they are usually fan-trained rather than espaliered into formal horizontal tiers. Fan training is its own discipline and worth learning, but it is not the same as espalier.
One thing worth noting: most espalier apple and pear trees need a pollination partner. Check compatibility before you buy. Two different varieties trained side by side on the same wall solves the problem neatly.
Espalier forms explained
The word “espalier” covers several distinct training forms. Some are simple, others will test your patience.
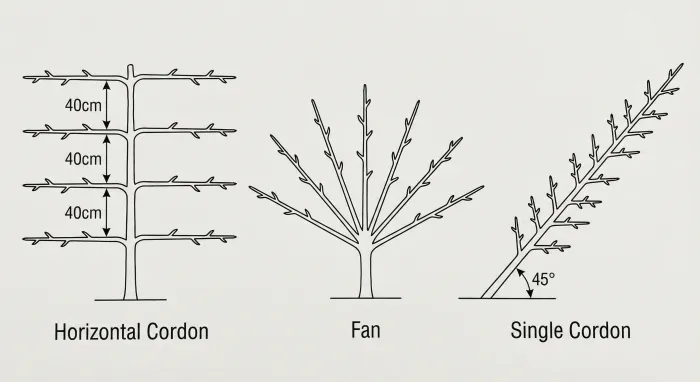
Horizontal cordon (the classic espalier). This is what most people picture. A central trunk with horizontal branches (called tiers) extending left and right at regular intervals, usually 40 to 50 centimetres apart. Two or three tiers is common for garden walls. Each tier is trained along a horizontal wire.
Single cordon. One stem grown at a 45-degree angle, with no side branches allowed to extend. Cordons are planted close together (60 to 90 centimetres apart) and are brilliant for fitting many varieties into a small space. A row of cordons along a fence gives you six or eight different apple varieties in the space of one freestanding tree.
Fan. Branches radiate outward from a short trunk like the ribs of a fan. This is the form used for stone fruits, cherries, plums, peaches, and apricots. Fans need more wall space than a cordon but suit trees that fruit on younger wood.
Palmette verrier. A more ornamental form where the branches curve upward at the ends like a candelabra. Beautiful but demanding to maintain. Probably not where you want to start.
Belgian fence. Multiple trees planted in a row with their branches trained into a diamond lattice pattern. Stunning when mature. Requires careful planning and several years of patient training.
For a first espalier, I would start with a horizontal cordon. Two or three tiers, apple or pear, against a sunny wall or along a post-and-wire fence. It is the most forgiving form and teaches you the fundamentals that apply to all the others.
Setting up the framework
Before you plant, you need support wires. For a wall, fix horizontal wires at the height of each planned tier using vine eyes and tensioning bolts. For a freestanding fence, use sturdy posts with wires strung between them.
The wires need to be taut. Sagging wires make training difficult and look untidy as the tree matures. Use 2.5mm galvanised wire and proper tensioners. This is one of those jobs where doing it properly at the start saves years of frustration.
Space the wires 40 to 50 centimetres apart, starting about 40 centimetres from the ground. Three tiers means wires at roughly 40, 80, and 120 centimetres. Adjust to suit your wall height and the vigour of your rootstock.
Plant the tree in winter while dormant, centred on where you want the trunk. If you are buying a pre-trained espalier (many nurseries sell them with one or two tiers already formed), you have a head start. If starting from a maiden whip (a single unbranched stem), you will be building the framework from scratch.
The training process
Training an espalier is a multi-year project. Each winter, you extend the framework. Each summer, you control the growth to keep it in shape.
Year one (maiden whip). Cut the main stem just above the height of the first wire, making sure there are three good buds below the cut. The top two buds will become the first pair of horizontal branches. The bud below them will continue as the central leader. As the shoots grow in spring, tie the two side shoots to canes angled at about 45 degrees. In autumn, lower them to the horizontal wire and tie them in.
Year two. The central leader continues upward. Cut it again just above the second wire, repeating the process to create the second tier. Meanwhile, the first tier branches are extending along their wire. Let them grow. Summer prune any side shoots on the horizontal branches, cutting them back to three leaves above the basal cluster.
Year three and beyond. Continue adding tiers if you want them. Once the framework is complete, cut the central leader to just above the top wire. From this point, maintenance is about summer pruning to keep the form and encourage fruiting.
Summer pruning is where espalier differs most from freestanding tree care. In July and August, you cut back all the new side shoots on the horizontal branches to three or four leaves. This redirects the tree’s energy from vegetative growth into forming fruit buds for next year. Miss this step and the whole thing turns into a mess of whippy shoots by September.
Why tracking matters with espalier
What caught me off guard with espalier is that the training decisions you make in year one affect the tree’s shape for decades. And the feedback is slow. You tie a branch to a wire in March, and you do not really know if the angle was right until the following summer when you see how it responded.
I found myself forgetting details between sessions. Which side had the weaker growth last year? Did I summer prune in July or August? How many leaves did I cut back to? These small details matter with trained trees because the form is so precise. A freestanding tree can absorb a sloppy pruning decision. An espalier shows every mistake.
Recording each pruning session, both winter formative work and summer maintenance, turned out to be more important for my espalier than for any other tree in the garden. The pruning log approach that works for freestanding trees becomes essential for trained forms.
What I track for each session: the date, which tier I worked on, what I cut back and to how many leaves, whether I adjusted any ties, and how the tree looked overall. Photos from the same angle each time are particularly useful for espalier because you can see the framework developing (or going wrong) clearly.
Over two or three years, the records reveal patterns. One tier might consistently produce more vigorous growth than the other, which tells you something about the root system or the light distribution. Summer pruning in late July might give different results than early August. You only notice these things if you wrote them down.
Common mistakes
Letting the top tier dominate. Trees naturally push growth upward. The top tier of an espalier will always try to grow more vigorously than the lower ones. If you do not manage this, you end up with a strong top tier and weak lower branches. The fix is to train the top tier last, and to prune it harder than the lower tiers.
Skipping summer pruning. Winter pruning shapes the framework. Summer pruning maintains it and encourages fruiting. Skip the summer session and you get a mess of long whippy shoots that shade out the fruiting spurs. It is the most common reason espaliers stop producing well.
Tying too tight. Branches thicken over time. Ties that are snug in year one will cut into the bark by year three. Check ties every spring and replace any that are getting tight. Use soft tree ties, not wire or string.
Starting too complex. A Belgian fence looks wonderful in photographs. But if you have never trained a tree before, start with a simple two-tier horizontal cordon. Learn the basics of summer pruning and growth management before attempting anything more ambitious.
Making it work in a small garden
Espalier is fundamentally a small-space technique. A horizontal cordon can fit along a 2-metre fence panel. A row of single cordons can line a path. A fan-trained cherry can cover a garage wall that would otherwise just collect moss.
The key is matching the form to the space. Measure your wall or fence before buying, and use the Spacing Calculator to check how many trained trees fit your available run. A two-tier espalier needs about 1.2 metres of height and 3 to 4 metres of width at maturity. A single cordon needs only 60 centimetres of width but wants 2 metres of height for the angled stem.
If you are growing against a house wall, leave a gap of at least 15 centimetres between the wall and the wires. This allows air circulation behind the branches and reduces disease pressure. It also makes tying in much easier.
The warmth from a south-facing wall is a genuine advantage. It can advance flowering by a week or two and improve fruit ripening noticeably. This is why pears and apricots do so well as wall-trained trees in the UK, the extra warmth compensates for our unreliable summers.
Espalier training is a multi-year project. Your memory is not.
Free for up to 30 plants. No card needed.
Getting started
If you have a sunny wall or fence and space for wires, you have enough to start. Buy a maiden whip or a one-year-trained espalier from a reputable fruit nursery. Set up your wires properly. And start recording from day one, because the decisions you make this winter will shape the tree for the next twenty years. The orchard record keeping guide covers what to track beyond pruning.
The technique is not difficult. It is patient. Each year you add a little more structure and learn how your particular tree responds to training. The records you keep along the way are what turn a decorative experiment into a productive part of your garden.
Further reading
For detailed pruning technique and timing:
- How to Keep a Fruit Tree Pruning Log. Recording what you did matters as much as knowing how to cut.
- First Year Fruit Tree Care. Getting the basics right from planting day.
- RHS: Growing Apples. Authoritative guide to cordon training.
- RHS: Growing Apples. The RHS approach to horizontal training.