I built my first raised bed without any plan at all. Threw together some scaffold boards, filled it with compost, and planted whatever I had. Tomatoes in the front, lettuce behind them, courgettes in the corner. By July the tomatoes had shaded out the lettuce completely, the courgettes had swallowed half the bed, and I was reaching over everything to harvest beans I had foolishly planted against the back fence.
The bed itself was fine. The layout was the problem. I had not thought about where the sun came from, which plants would grow tall, or how I would actually reach anything once it all filled in. That season taught me more about raised bed planning than any book.
Planning a raised bed layout is not complicated. But it does require thinking about a few things before you start filling soil and dropping in seedlings. This covers the decisions that actually matter: how big to make the beds, which way to point them, where to leave paths, and how to arrange plants so they do not fight each other for light and space.
Start with the bed, not the plants
It is tempting to start with a seed list and work backwards. I want tomatoes, peppers, beans, lettuce, herbs. How do I fit them all in? That approach leads to cramming. The better starting point is the bed itself.
Width matters most. The standard recommendation is 120cm (4 feet) wide. That lets you reach the centre from either side without stepping on the soil. Compacted soil is the enemy of raised beds. The whole point is loose, uncompacted growing medium, and you lose that the moment you stand in it. If your bed sits against a wall or fence, keep it to 90cm so you can reach the back from the front.
Length is flexible. Anything from 120cm to 300cm works. Longer beds are more efficient because you get more growing area relative to the frame material. But very long beds (over 300cm) can be annoying to walk around. I settled on 240cm as a good balance.
Depth depends on what you grow. Most vegetables need 15-20cm of root space. Carrots and parsnips want 25-30cm. If you are building on top of concrete or very poor soil, go deeper (30cm minimum) so roots have somewhere to go. On decent ground, 15-20cm is enough because roots will grow down into the soil below.
Paths between beds. Leave at least 45cm between beds for walking. If you use a wheelbarrow, you need 60-75cm. I have seen people squeeze paths to 30cm to maximise growing space, and they regret it every time they try to kneel down or carry a watering can through. Generous paths make gardening more pleasant, and you are more likely to actually tend a bed you can comfortably reach.
Orientation: where the sun goes
This is the layout decision that affects everything else, and the one most people skip. The direction your beds face determines which plants get full sun and which sit in shadow.
North-south beds (the long axis running north to south) are the default recommendation. The sun tracks east to west across the bed, so both sides get roughly equal light through the day. This works well for most vegetable crops and avoids one side being permanently shaded.
East-west beds make sense when you want to use tall plants as a deliberate shade screen. A row of sweetcorn or climbing beans along the south edge of an east-west bed creates shade for lettuce or spinach planted on the north side. In hot summers, that shade is a feature, not a problem.
Sloped gardens change the calculation. If your garden slopes south, beds running across the slope (east-west) catch more sun. If it slopes east or west, north-south beds work better. The goal is always the same: maximise the hours of direct sunlight on the growing area.
If you are not sure about your garden’s sun exposure, spend a day watching where shadows fall. Check at 9am, noon, and 4pm. That gives you a rough sun map. Fences, buildings, and trees all cast shadows that shift through the season as the sun angle changes.
Know what fits before you fill the bed.
Free for up to 30 plants. No card needed.
Arranging plants inside the bed
Once the bed is built and oriented, the real planning starts. Where each crop goes inside the bed makes a bigger difference than you would think.
Tall plants go north
This is the rule that saves the most headaches. Put your tallest crops on the north side (or the north end, if the bed runs north-south). Tomatoes, beans, sweetcorn, sunflowers. Anything that grows above 60cm. This way, they do not cast shadows over shorter crops behind them.
If you put tomatoes on the south side and lettuce on the north, the lettuce gets shade from midday onwards. In a 120cm bed, a 150cm tomato plant casts a shadow that covers most of the bed by late afternoon.
Group by water needs
Tomatoes, peppers, and aubergines all want consistent, deep watering. Lettuce and radishes want frequent, shallow watering. Mediterranean herbs like rosemary and thyme want to dry out between waterings. Grouping plants with similar water needs makes irrigation much simpler.
This does not mean you cannot mix them. But putting the thirsty crops together and the drought-tolerant ones together means you are not overwatering one group to keep another happy.
Think about harvest access
This is the one I learned the hard way. Crops you harvest frequently (lettuce, herbs, beans, courgettes) should be within easy reach. Put them on the edges of the bed, not the centre. Crops you harvest once (cabbage, broccoli, onions) can go in the middle where they are harder to reach, because you only need to get to them once or twice.
I now put cut-and-come-again lettuce along the front edge of every bed. I pick it almost daily, and reaching across tomatoes to get to it was never going to work.
Leave room for the plants you forget about
Courgettes. Squash. Cucumbers. These start as modest seedlings and become sprawling monsters. A single courgette plant will happily fill a 90cm circle by midsummer. If you have not accounted for that in your layout, it will push into neighbouring plants and shade them out.
The same goes for brassicas. A Brussels sprout plant needs 60cm in every direction. It looks absurd when you plant a tiny seedling with that much empty space around it. By autumn, you will be glad you gave it room.
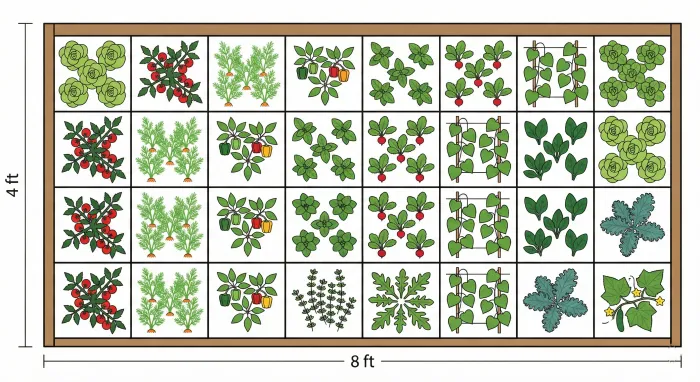
Square foot gardening: the grid approach
If you want a structured system for raised bed layout, square foot gardening is hard to beat. Divide the bed into 30cm (one foot) squares. Each square gets a set number of plants based on their spacing needs.
The numbers are simple. One tomato or pepper per square. Four lettuce. Nine beetroot or onions. Sixteen carrots or radishes. The grid makes it visual and removes the guesswork.
What I like about the square foot method is that it forces you to plan before you plant. You cannot just scatter seeds and hope. You draw out the grid, assign each square a crop, and plant accordingly. It also makes succession planting obvious. When you harvest the radishes from one square, you can see exactly where to sow the next batch.
The Spacing Calculator works well for this. Enter your bed dimensions and the spacing for each crop, and it shows you how many fit. It handles the maths so you do not end up with half a row of carrots and no room for the beetroot.
For a more visual approach, Leaftide’s plot designer lets you drag crops onto your beds and see how they fit together. It calculates spacing automatically and warns you if things are too close. I find it useful for trying different arrangements before committing to one, especially when I am juggling several crops in the same bed.
Common raised bed layouts that work
Here are three layouts I keep coming back to in 120cm x 240cm beds. Not the only options, but they work.
The salad bed
Four squares of cut-and-come-again lettuce along the front edge. Two squares of radishes. Two squares of spring onions. One square of basil. The back row gets two squares of climbing beans on a small frame (they add height without taking much ground space) and one square of cherry tomatoes on a stake.
This bed produces something to harvest almost every week from May to October. The lettuce and radishes turn over fast, so you can succession sow through the season.
The Mediterranean bed
Tomatoes along the back (north side), three plants spaced 50cm apart. Peppers in the middle row, four plants. The front row gets basil, with a square of chives at each end. This bed wants full sun and consistent watering. Everything in it likes the same conditions, which keeps things simple.
The root vegetable bed
Carrots and parsnips take up most of the space, planted in blocks rather than rows. Onions or garlic along one edge. A row of beetroot along the other. This bed is low-maintenance once planted. You sow it, thin it, and mostly leave it alone until harvest.
The key with root vegetables is soil quality. They need loose, stone-free soil to grow straight. If your raised bed mix has lumps or stones, sieve the top 20cm before sowing carrots. It takes twenty minutes and saves months of disappointment.
Planning for the whole season
A raised bed layout is not a single snapshot. It changes through the year. What you plant in March is not what occupies the bed in August. Early crops finish and leave gaps. Late crops need space reserved.
Succession planting means sowing the same crop every two to three weeks so you always have something at the right stage. Lettuce is the classic example. One sowing gives you about four weeks of harvest. The succession planting guide covers the intervals for each crop and how to plan the timing. If you want lettuce from May to October, you need six or seven sowings, each going into the space the previous one vacated.
Relay planting means following one crop with a different one. Early peas finish in June. That space can take a late sowing of French beans, or a round of quick-growing salad leaves. Garlic harvested in July leaves room for autumn-planted overwintering onions. Planning these transitions ties into crop rotation too, since each relay is a chance to follow one plant family with a different one.
Planning these transitions is where a layout tool earns its keep. Drawing it on paper works, but you end up with a stack of sketches for different months. A digital planner that shows your bed across time makes it easier to spot gaps. The plot designer in Leaftide does this with a timeline view, so you can see when each crop occupies space and where you have room for the next sowing.
Mistakes I see in raised bed layouts
Beds too wide. Anything over 120cm means you are stepping in the soil or straining to reach the middle. It is not worth the extra growing space if you compact the soil doing it.
No paths. Or paths so narrow they are useless. You need to kneel, carry tools, and move around the beds comfortably. 45cm minimum, 60cm if you can spare it.
Ignoring shade. Tall plants on the south side of the bed will shade everything behind them. This is the most common layout mistake and the easiest to fix. Just move the tall crops north.
Planting everything at once. A bed planted entirely in May has a glut in July and nothing in September. Stagger your sowings. Plan for the whole season, not just the first planting. Tracking your harvests makes the gaps obvious, so you can adjust next year.
Not accounting for plant size at maturity. That courgette seedling is 10cm across today. It will be a metre wide in eight weeks. Plan for the adult plant, not the baby.
From plan to soil
The best raised bed layout is one you actually follow. It does not need to be perfect. It needs to account for sun direction, plant height, access, and timing. Get those four things roughly right and the bed will perform well.
If you want to skip the graph paper, the Spacing Calculator handles the numbers and the plot designer in Leaftide handles the visual arrangement. Between them, you can plan a bed in ten minutes that would take an hour to sketch by hand.
But honestly, even a rough sketch on the back of a seed packet is better than no plan at all. The point is to think before you plant. Where does the sun come from? What grows tall? What do I pick often? Where are the paths? Answer those four questions and you are already ahead of most raised bed gardeners.
Plan your raised beds with real spacing data.
Free for up to 30 plants. No card needed.